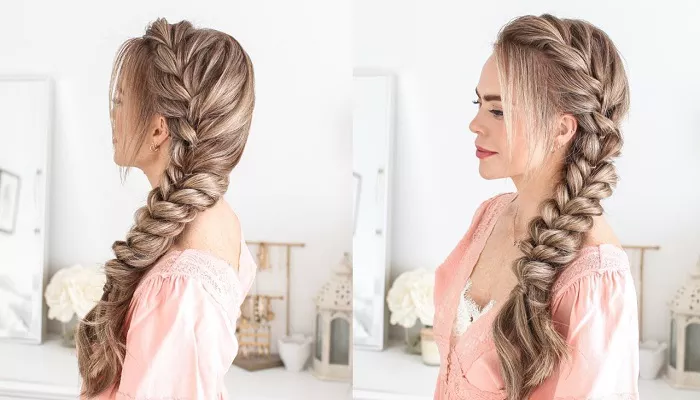
The French braid is more than just a classic hairstyle—it’s a versatile art form that suits casual days and special occasions alike. For women with long, fluffy curls, it provides a stylish way to manage volume while enhancing texture and movement. This detailed tutorial offers an easy, step-by-step approach to achieving a flawless French braid that works with, not against, naturally curly hair. Whether you’re preparing for a relaxed brunch or a formal evening event, mastering this braid can elevate your entire look.
What Makes the French Braid Special?
The French braid is elegant, tidy, and practical. It begins at the crown of the head and incorporates new hair as it progresses downward, keeping every strand secured. For fluffy curls, this technique adds structure without flattening your hair’s natural volume. The result is a balanced, soft braid that highlights your curls without overwhelming them.
Additionally, the French braid is ideal for showcasing the texture of curly hair. Unlike tighter styles that compress your curls, this braid flows with your natural wave, offering a three-dimensional look that is both dynamic and feminine.
Before You Braid: Prep Your Curls for Success
Preparation is key when working with curly or voluminous hair. Follow these simple steps to make braiding easier and your final result smoother:
- Clean Hair: Start with freshly washed and conditioned hair to avoid buildup and tangles.
- Detangle: Use a wide-tooth comb or detangling brush to gently remove knots without breaking your curls.
- Moisturize: Apply a leave-in conditioner or lightweight curl cream to keep your hair hydrated.
- Drying: Air dry your hair or use a diffuser. Fully dry curls hold braids better and prevent frizz.
French Braid: Easy Tutorial for Long, Fluffy Curls
Let’s break down the braiding process into simple, actionable steps. No prior experience required!
Step 1: Section Your Hair
Start by gathering a medium-sized section of hair at the crown. Divide this into three equal parts. Hold the right strand with your right hand, the left strand with your left, and let the middle strand rest between your fingers.
Step 2: Begin the Braid
Cross the right strand over the middle, then cross the left strand over the new middle. This is the basic braiding motion. For fluffy curls, braid loosely at first to keep volume intact.
Step 3: Add More Hair
Continue the braid by adding small sections of hair from each side before crossing the strands. Pick up extra curls from the sides and incorporate them into the braid. Move slowly to avoid tangling.
Step 4: Repeat and Braid to the End
Repeat the process—add hair, cross strands, and continue—until you reach the nape of your neck. At this point, you should have incorporated all of your hair. Braid the remaining length down to the tips and secure with an elastic band.
Step 5: Loosen and Style
Gently tug at the braid to loosen it slightly, enhancing the fullness and softness of your curls. Let a few strands frame your face for a more romantic look. You can also wrap a small section of hair around the elastic to hide it.
Tips for Success
- Use Clips: If you’re new to braiding, sectioning clips can help keep hair organized as you go.
- Practice on Damp Hair: If your curls are prone to frizz, try braiding slightly damp hair for a sleeker finish.
- Embrace Texture: Don’t worry about making it perfect. A bit of texture adds charm and authenticity to your braid.
Variations to Try
The basic French braid is just the beginning. Once you’ve mastered it, try these stylish variations:
- Side French Braid: Start at the temple and braid along the side of your head for an asymmetrical look.
- Double French Braids: Part your hair in the middle and create two braids for a sporty, youthful style.
- French Braid Bun: Braid your hair, then twist it into a bun for a more formal updo.
Why Fluffy Curls Work Beautifully with French Braids
Curls naturally add volume and texture, which means your braid will look fuller and more intricate. The twist and pull of each strand amplify the curl’s dimension, turning a simple braid into a showpiece. Best of all, this style protects your ends, making it ideal for long-term curl care.
Essential Tools for Braiding Curly Hair
- Wide-Tooth Comb: Essential for detangling without breakage.
- Moisturizing Spray: Keeps curls pliable and reduces flyaways.
- Hair Elastics: Choose soft, snag-free bands that won’t damage your curls.
- Edge Brush: Optional for smoothing hairlines if you prefer a sleek finish.
Post-Braid Care and Maintenance
After wearing your braid for a day or two, it’s important to give your curls some love:
- Gently Unravel: Don’t rush. Take your time removing the braid to avoid tearing your hair.
- Finger Detangle: Use your hands instead of a brush to separate curls without breaking them.
- Hydrate Again: Refresh your curls with a leave-in or light oil to restore moisture.
Perfect for Every Occasion
From beach days to weddings, the French braid fits every scenario. It can be styled casually for errands or dressed up with accessories for formal settings. It’s also a go-to protective style, which makes it a favorite in many Women Hairstyle routines.
Inspiration from Everyday Looks
If you’re searching for fresh Women Hairstyle Ideas, the French braid offers endless inspiration. Add ribbons for a playful touch, or combine it with twists and knots for something more dramatic. Many influencers and celebrities are now embracing natural textures, making braided styles trendier than ever.
Conclusion
Learning to French braid long, fluffy curls is a skill worth having. It combines function with fashion, helping you express your personal style while keeping your hair healthy and protected. With a bit of patience and practice, you can transform your everyday look into something elegant and timeless.Whether you wear it loose, twisted into a bun, or paired with accessories, the French braid proves that simple styles can make the biggest impact.


